You Won’t Believe How Easy This Creepy-Cute Goblin Is to Knit
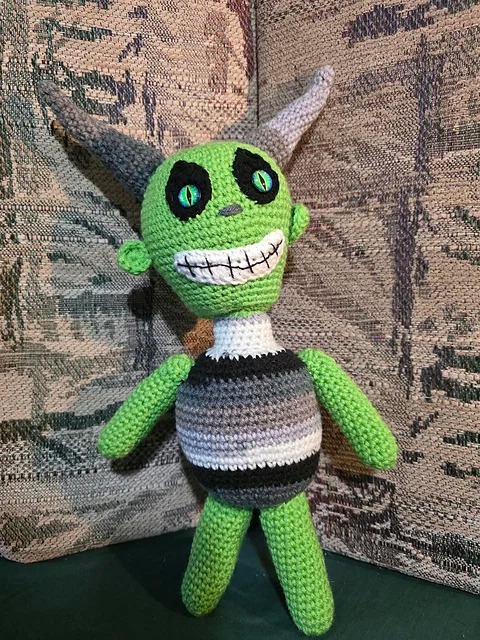
There is something incredibly rewarding about watching a personality emerge from a simple ball of yarn. As seen in the image amigurumi allows us to venture beyond traditional scarves and sweaters into the realm of whimsical creatures. This quirky green goblin is a perfect example of how texture and color choices can tell a story.
Working on a piece like this requires a shift in mindset. Instead of focusing on the drape of the fabric, you are sculpting with your stitches. The tight, consistent tension of the single crochet creates a sturdy “skin” that holds its shape even after stuffing. What makes this character pop is the contrast—the vibrant lime green against the muted grey and black stripes of the torso, topped off with those imposing grey horns.
The real magic, however, is in the details. The embroidered wide grin and the felt-backed safety eyes give this fellow a mischievous glint that looks like he’s ready to hide your favorite pair of knitting needles! Projects like these are excellent for using up scrap yarn and practicing your embroidery skills. Whether you’re a seasoned pro or just starting your amigurumi journey, there’s no limit to the creatures you can bring to life.

Pattern Guide: The Grinning Forest Goblin
While this character is crocheted, here is how you can achieve a similar look using a knitting approach for those who prefer the needles.
Materials:
- Yarn: Worsted weight in Lime Green, Black, White, and Grey.
- Needles: US 3 (3.25mm) DPNs or circulars for magic loop (to ensure a tight, no-hole fabric).
- Extras: Poly-fill stuffing, 12mm safety eyes, and a tapestry needle.
The Method:
- Head & Body: Knit from the top down. Start with the lime green head in the round, increasing to a sphere. Switch to the striped pattern (Black, Grey, White) for the pear-shaped torso.
- Limbs: Work four simple tubes in lime green. I-cords work beautifully for thinner arms, while stuffed tubes are better for the legs.
- Horns: Using grey yarn, cast on a small number of stitches and increase every other row to create a sharp cone shape.
- Finishing: Stuff all pieces firmly. Use a “duplicate stitch” or basic embroidery to create the wide, toothy grin and the dark circles around the eyes. Sew the limbs and horns securely to the body.
Rasmus Grinn
Materials -
Hooks: 5mm and 4.5mm
Yarn: Worsted weight yarn
Red Heart - Newspaper Stripe
Red Heart - Spring Green
Red Heart - White
Red Heart - Black (smaller amount)
Other: Safety eyes, scissors, stitch markers, yarn needle, and fiberfill stuffing.
Eyepatches (Make 2)
Hook: 4.5mm | Color: Black
1. sc 6 into MR (Pull closed, but not too tight. Leave enough space in the center for the post
of the safety eye.)
This round is worked with two stitches into each stitch of R1:
2. [sc-inc], [hdc-dc], [tc-picot-tc], [dc-hdc], [sc-inc] (12)
slst into next. F.O. Leave tail for sewing.
Head:
Hook: 5mm | Color: Spring Green
1. sc 8 into MR
2. inc around (16)
3. [inc, sc] around (24)
4. [inc, sc 2] around (32)
5. [inc, sc 3] around (40)
6. [inc, sc 4] around (48)
7-8. sc around (2 rounds of 48)
9. [inc, sc 5] around (56)
10-17. sc around (8 rounds of 56)
Safety Eyes are put through the center of the eye patch, then attached to the head between
rounds 11 & 12 with about 1" between patches. Use tails to sew edges down and weave in
ends.
18. [dec, sc 5] around (48)
19. sc around (48)
20. [dec, sc 4] around (40)
21-22. sc around (2 rounds of 40)
23. [dec, sc 3] around (32)
24-27. sc around (4 rounds of 32)
Begin to stuff the head.
28. [BLO dec, sc 2] around (24)
29. [dec, sc 2] around (18)
slst into the next, leave a long tail. Finish stuffing head, being sure to fill in bottom edges.
Body
Hook: 5mm | Color: Newspaper Stripe
1. sc 8 into MR
2. inc around (16)
3. [inc, sc] around (24)
4. [inc, sc 2] around (32)
5. [inc, sc 3] around (40)
6. BLO - sc around (40)
7. [inc, sc 4] around (48)
8-12. sc around (5 rounds of 48)
13. [inc, sc 5] around (56)
14-21. sc around (8 rounds of 56)
22. [dec, sc 5] around (48)
23-24. sc around (2 rounds of 48)
25. [dec, sc 2] around (36)
26. [dec, sc] around (24)
27. [dec, sc 2] around (18)
28-32. sc around (5 rounds of 18)
slst into next. F.O. weave in the end. Stuff body and neck.
Arms (Make 2)
Hook: 5mm | Color: Spring Green
1. sc 6 into MR
2. [inc, sc] around (9)
3. [inc, sc 2] around (12)
4-15. sc around (12 rounds of 12)
16. sc, hdc 4, sc, slst, ch 1, turn
17. skip 1, sc, hdc 4, sc, ch 1, turn
18. skip 1, hdc 4, slst into next, F.O. Leave tail for sewing. Stuff arms lightly.
Legs (Make 2)
Hook: 5mm | Color: Spring Green
1. sc 6 into MR
2. inc around (12)
3. [inc, sc 3] around (15)
4-18. sc around (15 rounds of 15)
slst into next. F.O. Leave your tail for sewing. Stuff legs.
Horns (Make 2)
Hook: 4.5mm | Color: Newspaper Stripe
1. sc 4 into MR
2. sc 4
3. inc, sc 3 (5)
4. sc 5
5. inc, sc 4 (6)
6. sc 6
7. inc, sc 5 (7)
8. sc 7
9. inc, sc 6 (8)
10. sc 8
11. inc, sc 7 (9)
12. sc 9
13. inc, sc 8 (10)
14. sc 10
15. inc, sc 4, inc, sc 4 (12)
16. sc 12
17. [inc, sc 3] around (15)
18-20. sc around (3 rounds of 15)
slst into next. F.O. Leave your tail for sewing. Stuff.
Ears (Make 2)
Hook: 5mm | Color: Spring Green
1. sc 9 into MR
2. sc 9. F.O. Leave your tail for sewing.
Mouth
Hook: 4.5mm | Color: White
1. ch 15. Starting in the second chain from hook: sc, hdc 3, dc 6, hdc 3, sc.
2. ch 1, working on opposite side of original chain: sc 14, ch 1, slst into the sc of the
previous row. F.O. Leave your tail for sewing.
Assembly -
Mouth: Use black yarn or embroidery floss to stitch tooth lines, then sew to head 3 rounds
below the eyes.
Nose: Use black to stitch on a nose centered at the bottom of the eyes.
Finishing: Sew ears to sides of head just above mouth. Sew horns to the head. Sew head to
body. Sew arms on sides and legs to bottom.